uCalc Search was developed after spending an entire month examining over 80 programs/applications/tools that are either search-based or that incorporate a search feature (if you think I may have missed any, please let me know). uCalc offers a powerful and useful new way of performing search and search/replace operations, which is not yet possible with any of the other existing tools. My goal is twofold: 1. for software developers eventually to widely adopt uCalc technology and incorporate it into their applications, and 2. to also turn this program here into the best ever end-user tool for searching your PC and for performing search/replace operations.
Below are just some examples of what uCalc Search can do. They barely scratch the surface. Please bookmark this page, and check back from time to time to see additional examples, and download newer betas. Let me know which examples resonate with you. Please ask questions; this will help clarify the product, and may inspire other useful examples for this page.
Note: This product is still under bata. Things may not always work as expected. And due to rapid changes, things may work differently from one beta to the next. Documentation is planned for a later stage. Although this program is intended for everyone, the first round of examples might appeal more to programmers.
Example A: File Search (uCalc Search vs Windows 7 Search)
Example B: Extracting text
1. Extracting a list of property names from VB.NET source code
2. Generating new source code based on existing property names
3. A step further - skipping over comments
Example C: Creating php code for an HTML form (added 9/10/12)
Example D: Adding color & indentation to BASIC files (added 8/24/12)
Example E: Cleaning up HTML code (added 8/27/12)
Example F: Alternative to XSLT for transforming XML (added 8/27/12)
Example G: Working with MS Word files
1. Parsing XML to extract plain text
Example H: Parsing LMNL - Layered Markup and Annotation Language (added 9/21/12)
A number of existing examples were updated on 9/05/12
Example A: File Search (uCalc Search vs Windows 7 Search)
Have you ever searched your PC for a file you know for sure was somewhere on your computer, but Windows 7 just wouldn’t find it?
I wanted to search the entire C: drive on my test laptop for files containing the word uCalc. I’m pretty sure that I have quite a few. However, Windows 7 search couldn’t find most of them. It only returned files where uCalc was part of the file or folder name. It didn’t bother to search the contents of any files. Sure, I could go to the Control Panel and fiddle with the index. But as you’ll see, even that has its limits. Furthermore, Windows 7 Search is instantaneous when dealing with indexed folders. However, it was relatively slow when I searched across the entire C: drive for uCalc (even though file content wasn’t even included in the search).
Ok how about this? I have a folder that is in fact indexed. I’m pretty sure I have a file in there somewhere with this line of code:
For x = 1 To ucParam(Expr, 2)
However, Windows 7 couldn’t find it. Nor could it find files containing things like ########, or "Win32API.inc" (where quotes are part of the text I’m looking for). Why not? Maybe it doesn’t like special characters like the equal sign, parenthesis, quotes, or #, etc. I’m not sure. But that’s not good if you’re a programmer and want to search through source code. uCalc does not rely on an index, nor does it use mysterious rules to decide what to search. It searches what you tell it to, on your terms. It may take its time, but it finds what you need. Better to wait 30 seconds and find what you were looking for, than to give up after a half hour of many "instantaneous" search sessions that end up not finding what you want.
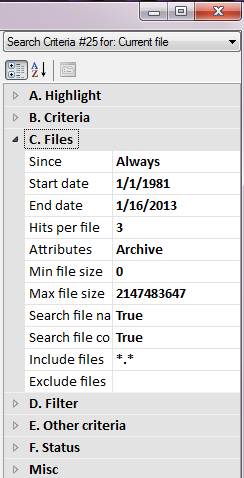
In addition to powerful search patterns explained further down, there are a number of properties specifically related to refining your file searches. You can select ranges for file dates and sizes. You can have it include or exclude groups of files, restrict the search to file names or contents only, etc.
Note: Currently, uCalc searches mainly through plain text files. However, as you’ll see in the MS Word docx example further down, you can easily create extensions to make it search through any kind of file. The plan is to eventually have extensions for all files known to mankind for which the file format is publicly available (without the need for any additional third party tools). This can eventually be achieved in an Open Source type collaboration and/or with the help of employees I hope to hire for this purpose.
Part1: Extracting a list of property names from VB.NET source code
This example is based on an actual task I needed to accomplish. The following is a partial listing of VB.NET code I’m working on. You may recognize these as the search properties you’ll find in the uCalc Search program.

From the above text, I needed to extract just the names of the properties, so that I’d end up with a simple list like the following (1 property name per line):
BackColor
Font
ForeColor
Highlight
CaseSensitive
Exclude
Min
Max
.
.
.
I could have manually gone through each line, and done a copy-paste operation for each property name (the word that comes just after Public Property on each line). However, that would have been too discouragingly time-consuming (the actual list is much longer than the brief snippet I’ve posted here). The solution using uCalc was extremely simple. I have circled and numbered the steps:
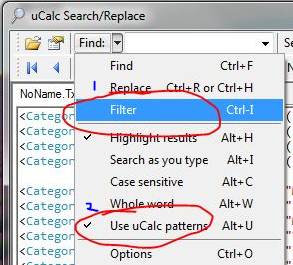
1. Select Filter from the dropdown (the default is Find).
2. Make sure the Use uCalc patterns option is also check-marked.
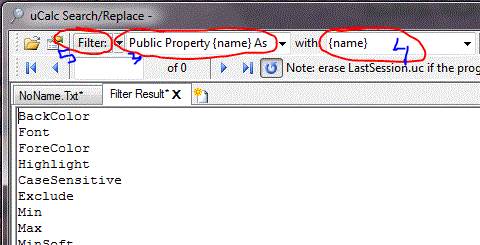
3. Add the following search pattern in the search box: Public Property {name} As.
4. Add {name} in the second box.
5. Click the Filter button. (Note: If you are following these examples sequentially, first be sure that next to Search in, it says Current file)
Explanation
This searches for occurrences of the words Public Property, followed by {name} (whose value is different for each line) followed by As. An item between braces { and } represents a pattern variable. It doesn’t matter what the variable is called, as long as it matches the variable name used in the second box. Instead of {name}, we could have used {PropertyName}, or {x} just the same. The second box contains the output text that should appear in our list. The text in the second box can be anything. Typically, it will be composed of some kind of reformulation of text from the first box. In this example, I just needed the property name to be listed, so I put {name} in that box.
Part 2: Generating new source code based on existing property names
What I actually needed was not just a listing of properties. My real intention was to create a routine that copied the values from each public property of one object into the properties of another object. I wanted the output to look like the text below:
What I did here was simply modify the second box so that the output could look the way it does above. Instead of just {name}, the box circled in red says: Dest.{name} = Source.{name}. The output is modified accordingly.
Part 3: A step further - skipping over comments
As it turns out, my source code is constantly being modified. I’ve been adding new properties, deleting others, and also temporarily commenting out a few that I might get back to later. I didn’t want the filter to return properties that were commented out. So now it’s time to use the multi-search feature. To open the multi-search table, click the button circled in red:
Some of the lines in my Visual Basic source code are commented out with the single quote character, while others are commented out using the #If 0 Then / #End If construct. It can all be taken care of at the same time under multi-search. Here are the search patterns for this:
Note: This is not the solution yet. I have
simply made it highlight the patterns in different colors and clicked the blue Find
Next (![]() ) button to get an idea of what
patterns will be matched. Each search pattern has its own set of criteria
properties, which can be configured independently. So I set a different
color for each search criteria; alternatively you can change colors by clicking
the color box beneath the Color column (left click for foreground, right-click
for background).
) button to get an idea of what
patterns will be matched. Each search pattern has its own set of criteria
properties, which can be configured independently. So I set a different
color for each search criteria; alternatively you can change colors by clicking
the color box beneath the Color column (left click for foreground, right-click
for background).
Aside: The full feature set for defining search patterns is simple but very rich. These examples highlight only bits and pieces of it. Full documentation will be forthcoming eventually. The second pattern matches a single quote followed by everything else after it on the same line. The first pattern captured just one token (word) in this context because it was delimited by the word As. A pattern variable captures any number of tokens delimited either by the end of the line or a token. You can optionally specify the number of tokens that a variable must match. So for the first pattern, if you did not want to use the token word As as delimiter, you could use a different approach to achieve the same result like this: Public Property {name:1}, where the 1 means it will pull in exactly one token following the words Public Property.
The third pattern introduces the + character (within the pattern variable named {etc}), which allows it match patterns not just up to a delimiter such as new line, but across multiple lines. For a bit more visual clarity, let’s make the pattern description itself span multiple lines:
Ok. Now that we see which patterns will be matched, we need to change the properties for commented code to SkipOver before performing the Filter operation. As the name indicates, it will skip over any code that matches the given pattern. After that, you can click on the Filter button to get the new results. Note also that I’ve highlighted the separator character, which is already {#10} by default (ASCII code for New Line). But you may change this to anything else.
Technically, here we could have kind of gotten away without Skipover, since the commented patterns are changed into a blank; in that case you’d have a few blank lines in place of the commented lines.
Example C: Creating php code for an HTML form
This example is something that I actually needed to do recently. My online user satisfaction surveys looked fine, but if you clicked the Submit button you’d get an error. That’s because the forms were being posted using an ancient form tool that is no longer supported on the server I use. I needed to update the forms using php code. I kept on procrastinating. Browse through the messy HTML code (there’s a lot of blank space towards the top, so scroll down to view it better) that belonged to http://www.ucalc.com/old/2006/survey1.html to see why. I created those forms many years ago, probably manually or using FrontPage; and they’re imbedded in HTML code that was auto-generated by another old tool; back then, I wasn’t trying to win a best HTML code contest; I just wanted surveys that worked. Fast-forward to now. I wasn’t looking forward to sifting through that jumble of old code and manually adding line after line of php code for this survey, and then doing the same thing all over again for the other surveys.
Here comes uCalc to the rescue. I realized that I could just take the raw HTML just the way it was (badly formed HTML elements and all), and with just a few lines of uCalc transformation code, have it filter out the questions and answers, and spit out usable php code. Thanks to this, my surveys now work again. The original HTML survey form code itself remains almost unchanged. What changed, is the additional code that now posts using the newly created php files.
Here’s the transformation code at top (tailored specifically for the code in my old forms), followed by the resulting php code in the output window at bottom.
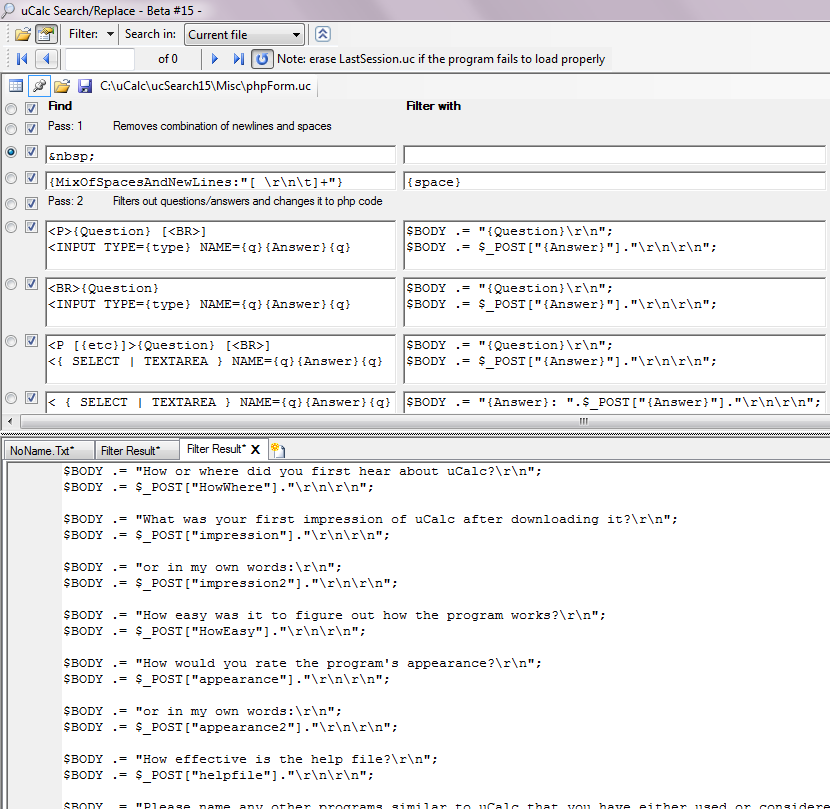
Explanation
The section at top is the transformation code. If you either load or paste this HTML code into uCalc Search, and then click the Filter button, you get the auto-generated php code that you see at the bottom (the list of auto-generated code goes beyond the snapshot posted here). Had the original HTML code been cleaner, this could have taken fewer lines. But my goal was to work with the original code, just the way it was. So in Pass 1, I have it strip out unsightly occurrences that were in the original, as well as newline and tab characters, which I didn’t want imbedded in the question strings. Some INPUT TYPE questions were located between <P> and an optional <BR> while others came after <BR>, which is why I have two lines to capture INPUT TYPE patterns. SELECT and TEXTAREA type questions tended to be imbedded between a <P> which sometime had extra attributes (denoted by the optional [{etc}]) and sometimes a <BR>. Some SELECT or TEXTAREA questions didn’t quite match those patterns, so the last line catches the rest of them. For those, it uses the variable name in place of the question.
Can you see how much time this will save you if you need to do something similar? Plus you don’t have to worry about introducing errors due to typing fatigue that would occur if you had to do each line manually; and furthermore, since it’s so easy, you no longer need to procrastinate for such tasks as I had been doing.
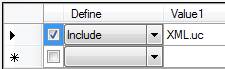
This example requires the XML.uc file. Click the leftmost button above the transforms to see a table like the one below.
Part 2:
As you are constructing transformations like the one above, you will first want to interactively test out the patterns before modifying any text. I have circled in red some features that are useful in this regard:
1. Click properties, and turn off highlighting for patterns that might not need it (like the first two).
2. Click navigation buttons to jump to the next or previous matches.
3. Click the save button from time to time to save your work.
4. Sometimes you may want to remove checkmarks on some patterns as you focus on others.
5. Select a color for each pattern to help visualize the matches that are found.
6. It’s useful to know at a glance how many matches per pattern you’re getting.

Part 3:
At one point, I was tired of all the extraneous HTML code beyond the form. While constructing the patterns, I wanted to see the HTML code for just the form itself. So I filtered it out into a new document. I wanted to capture everything in between <FORM and </FORM>, hence {etc+}. The + sign tells {etc} to cross boundary delimiters, otherwise it would stop at the first occurrence of > or <. Before clicking Filter, click on the blue Find Next button to make sure the pattern is matching the right thing. {Self} means that the filtered output will display the match itself. Optionally, we could have instead filtered out {body} from <FORM{etc}>{body+}</FORM> if we didn’t want <FORM {etc}> and </FORM> to be part of the output. Note: if you are doing this right after the previous example, you must first clear out the other patterns (but make sure XML.uc is still included).

Example D: Adding color & indentation to BASIC files
This example takes unformatted BASIC code (particularly of the PowerBASIC dialect), and adds proper indentation, as well as color. Here’s a list of some of the modifications performed on the code:
1. Adds indentation
2. Adds color to quoted text, keywords, comments, ASM code
3. Adds normalized spacing around commas, and operators
Before (here’s what the intentionally jumbled sample source code file looks like):
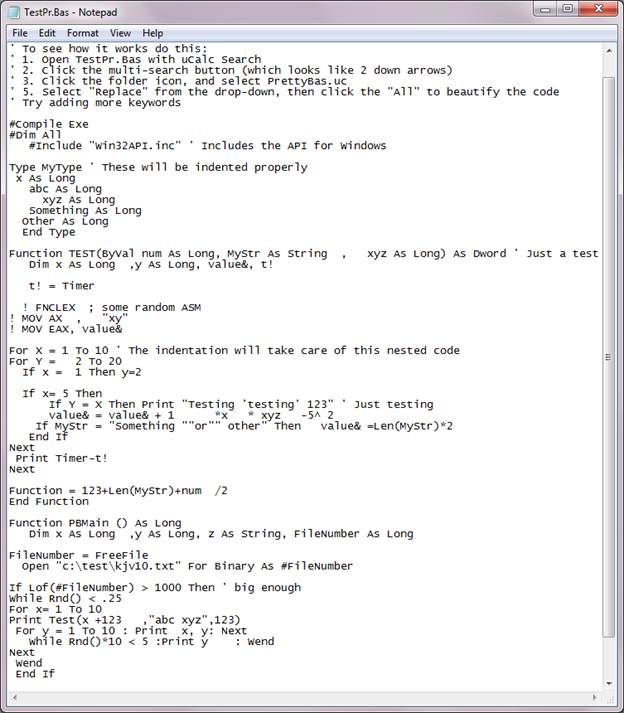
After (nicely formatted with indentation & color-coding):
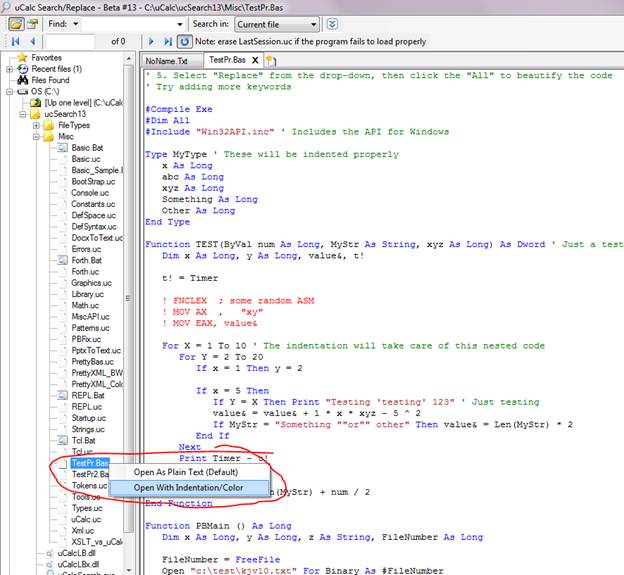
Note: You can open .Bas files from within uCalc in formatted form by simply right-clicking on the file, and selecting Open With Indentation/Color as I’ve done above. I’ve added only just enough keywords and rules for sake of demonstration.
Explanation
A file named bas, placed in the FileTypes folder is what allows you to right-click files with the .Bas extension. Here’s what it looks like:
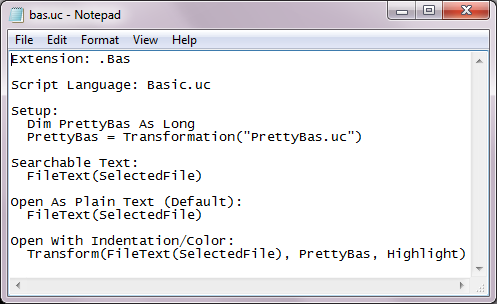
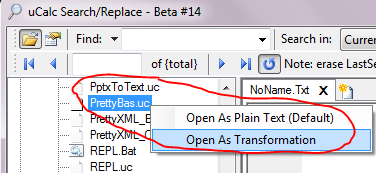
Notice in the Setup section that this transformation is based on the rules defined in a text file named PrettyBas.uc. As mentioned above, you can right-click a .Bas file to see the result. To interactively modify the transformation rules, right-click PrettyBas.uc:
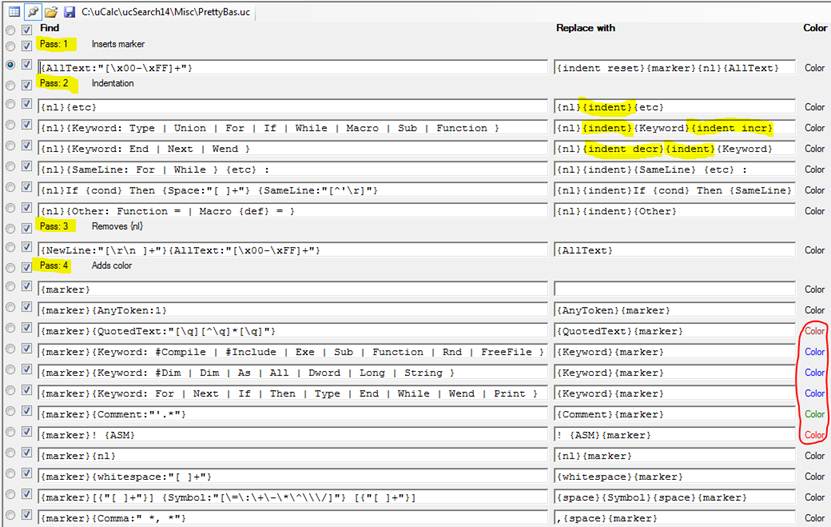
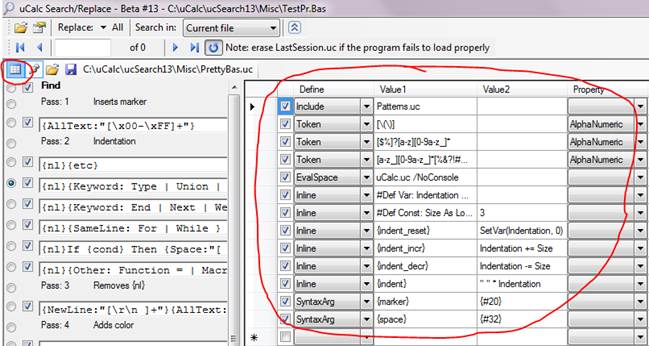
The PrettyBas.uc transformation file should look like this:
Generally most of the rules will go in the above Find/Replace section. However, there is a definition setup section that looks like this (click the button at left that’s circled in red to reach that):
To test changes that you make, click on the All button next to Replace
Explanations
· {nl} represents the new line character, as defined in Patterns.uc. Alternatively it could have been written {#10}, or {nl:"\n"}.
· The line under Pass: 1 resets the indentation size to 0, and inserts a {nl} at the beginning of the file, as well as a marker.
· Pass: 2 performs indentation; it inserts indentation in front of each line; some lines also cause the indentation size to increase or decrease.
· Pass: 3 removes the {nl} that was inserted in Pass 1 (which was required in case the very first line started with a code block).
· Pass: 4 gradually moves the marker from the start of the text to the end, adding color along the way where appropriate (note the column of color on the right).
· Quoted items within curly braces, such as {Comment: "'.*[\r\n]"} are regular expression patterns.
· Note: In addition to general passes, each pattern match can be passed over again after each change. Under Pass: 1, Pass: 2 and Pass: 3, each pattern has the default Pass once: True setting. However, under Pass 4, they are (most of them) set to False, which allows multiple changes, such as change of color as well as moving of the marker.
Example E: Cleaning up HTML code
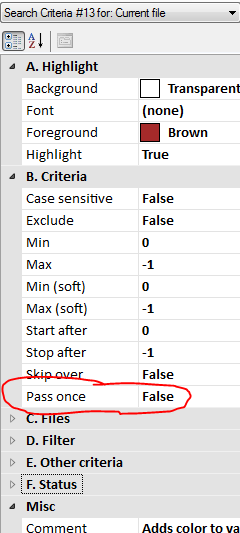
This document you’re currently viewing was created with Microsoft Word 2010. To view the HTML (of a previous edition of this document) click http://www.ucalc.com/beta/ucsearch.htm , then right-click anywhere on the page and select View source (or equivalent depending on the browser). When I did this myself, I noticed a bunch of HTML code added by MS Word, which appears to be unnecessary for viewing the page. Perhaps this extra code might even make this page load more slowly. The code in question is found within some, but not all comment sections; some comment sections are actually interpreted by Internet Explorer in a useful way. Anyway, by visual inspection, I find that the pattern for the code I don’t want looks like this:
<!-- {etc}> {etc2+} <! {etc3} -->
As it turns out, this simple description happens to be all
you need to place in the search box in order to capture those sections of
code. Compare that with having to write a program in C++ to do it, or
doing a search using unsightly regular expression patterns. (This
example is used for sake of demonstration; MS Word already has a built-in
option to save a file as a filtered web page). Note: HTML and XML
searches work best when XML.uc is included,
instead of the default Patterns.uc. So before running this example, click
![]() followed by
followed by ![]() , and make sure that XML.uc is
included.
, and make sure that XML.uc is
included.
You need to try it with the entire file to get the full feel
of how it works. At first, click on the Find button,
and scroll down to see what patterns it will match. You can use the
navigation buttons ![]() to jump to the highlighted
matches and see what they look like. Once you are satisfied, change the Find button to Replace,
and click All To execute the changes.
to jump to the highlighted
matches and see what they look like. Once you are satisfied, change the Find button to Replace,
and click All To execute the changes.
Example F: Alternative to XSLT for transforming XML
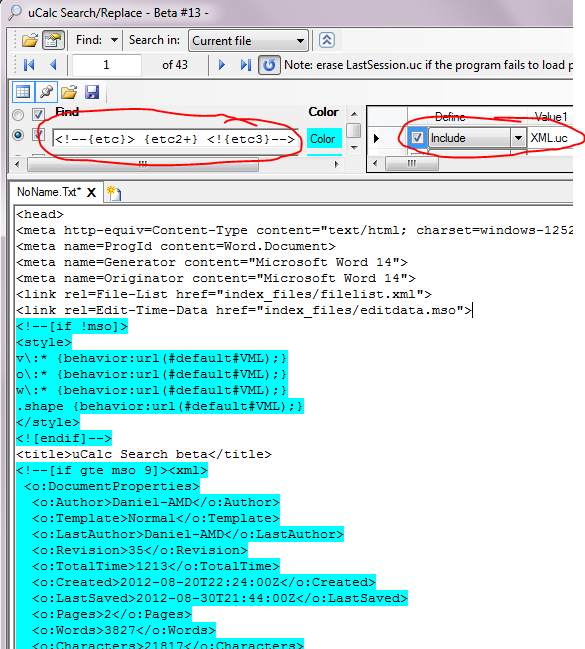
The following is directly based on the XSLT tutorial example found at www.w3schools.com/xsl/xsl_transformation.asp for transforming XML code. I believe you’ll find the uCalc method below much easier. The uCalc transformation code below is meant to work with (and was tested with) the actual cdcatalog.xml file from that page. To run this example right-click the XSLT_vs_uCalc.uc file, and select Open As Transformation so that it looks like this:
(Note: The Include: XML.uc part is hidden from view unless you click the Def button; I circled it only so that you understand that it is used here; however, you don’t have to bring it into view for it to work):
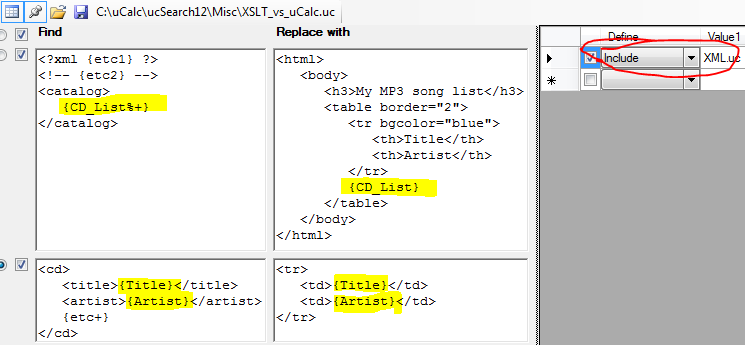
1. Then save this file: http://www.w3schools.com/xsl/cdcatalog.xml locally and open it with uCalc (Note: pasting directly from the screen may add extraneous characters and prevent this example from working).
2. Click the All button (next to Replace) to execute the transformation.
3. For a nicely formatted color coded rendition of the output, load PrettyXML.uc and click All.
Explanation
Compare the very direct transformation code above with the one in the XSLT tutorial. With XSLT, you must add a style sheet reference to your XML code. This isn’t required with uCalc. The presence or absence of a reference doesn’t bother uCalc either way. Here, the transformation assumes the presence of such reference, and simply ignores it. XSLT requires various extra lines of XSLT-related elements to select which element to extract data from, and to determine how to loop through it, etc. None of that is necessary with uCalc. Notice the very tight correlation between the code in the Replace with column, and what the actual output will look like. The only thing to know here is that items between curly braces, such as {CD_List}, {Title}, and {Artist} are pattern variables. {Title} captures whatever text is between <title> and </title>, and {Artist} captures everything between <artist> and </artist>. {CD_List} captures everything between <catalog> and </catalog>; but you’ll also notice in that one, two characters within the curly braces: % and a +. The % causes it to perform an immediate transformation of the captured pattern (a different approach that wouldn’t require % would be to reorganize the transformation using multiple passes). The + operator tells the pattern to match data across separator boundaries (such as > and <).
Can the above transformation syntax possibly be any more straightforward?
Example G: Working with MS Word files
By default, uCalc searches only through plain text files. However, it
allows you to create extensions that can search through any conceivable
file. These extensions use the very same kinds of patterns encountered in
previous examples, coupled with simple scripting code interpreted by the uCalc
Language Builder. I have included MS Word .DOCX, and PowerPoint .PPTX
extensions. Hopefully in the future, with a combination of hired uCalc
employees, and programmers at large, there should be an expansive library of
extensions covering PDF, RTF, WP, DLL, GIF, JPG, .WAV (for their text meta
data), older MS Office formats, and any and every other kind of file type that
has a published format.
No need to have an installation of MS Office; nor do you need another third party tool!
Here I’ll discuss MS Word files. However, the PowerPoint file structure (also supported in this beta) is very similar. With the extension implemented, when you right-click a docx file (first click the folder button at the top if you do not yet see a list of files), you will see several options for opening such files. These options are defined in a plain text file named DocX in the FileTypes directory, which contains the following code:
See the ReadMe.Txt for more details that aren’t discussed here. To see how this works, right-click any docx file from within uCalc, and open it with the Raw XML option (docx files are merely zipped XML files). Then click the multi-search button. To see what the transformation file looks like, right-click DocxToText.uc and select Open As Transformation. It should look like this:

After browsing through the raw XML text, examine the above transformation code to see how straightforward it looks. Could it be any simpler? (This is not a rhetorical question; I am constantly trying to find ways to simplify things; if you find anything unnecessarily complex or confusing, please be sure to let me know).
Explanation
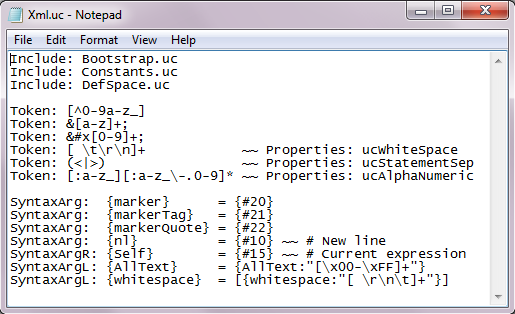
I have added only some of the more essential transformations. You can add as much as you’d like to this. If you are familiar with XML, you will be familiar with what most of the above represents. I’ll explain only the rest. The strategy in this transformation is to simply strip away all XML tags, exposing only text found in the paragraph element, and to change certain character codes to the actual characters they represent. I’ve discussed pattern variables in previous examples, so the {etc} variable should seem pretty straight-forward. {#10} as discussed previously represents the newline character code (ASCII decimal 10). Others codes such as {#226#128#156} were determined simply by saving a MS Word test file containing special characters like smart quotes, and examining the XML to see their numerical equivalent. w:p is simply a MS Word paragraph tag (see http://office.microsoft.com/en-us/open-xml-ii-editing-documents-in-the-xml-RZ010357030.aspx?section=4 ). {paragraph} contains several extensions I haven’t discussed yet. The + character was previously discussed in the context of spanning multiple lines. What it really does is allow the spanning of boundaries. Newline is defined as a boundary in the default Patterns.uc file. However, everything in uCalc is configurable. This particular transformation module draws on XML.uc instead of Patterns.uc (these are plain text files you can examine/modify with Notepad), where < and > are defined as boundaries, and newline is defined as whitespace. Click the grid button to verify how XML.uc is included, and then open XML.uc with Notepad or uCalc, to examine its contents.

By default, pattern variable matches are conveniently stripped of surrounding whitespace. However, in some cases, such as here, surrounding spaces are part of the data. The $ next to + in the {paragraph} variable preserves whitespace. The % character causes the paragraph to be re-parsed immediately. It’s not the only way, but it’s faster in this context.
To perform the actual transformation, make sure to select Replace in the Search drop down, and then click the All button next to it. Note that the Highlight property is set to False, since it would only muddy the appearance of a search/replace operation in this context.

Now let’s examine the PrettyXML_BW.uc transformation file, which takes raw unformatted XML, and pretties it up with indentation. Here are the Before/After appearances:
Before:
After:
The PrettyXML_BW.uc file looks like this (when opened by right-clicking and selecting Open As Transformation):
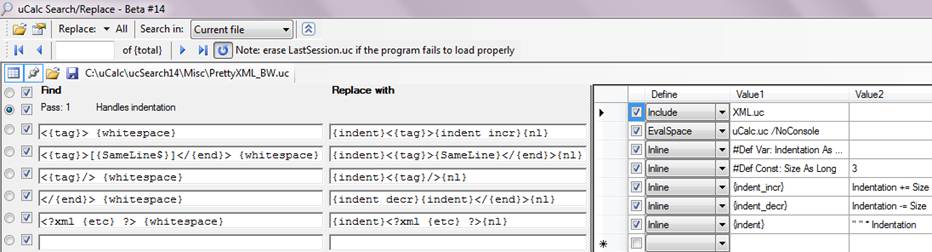
Explanation
Hopefully upon examining the section to the left, you’ll see the simple algorithm that indents each XML start tag, and increments or decrements the indentation size, depending on whether you are at the beginning or ending of a tag. Something new here is the square brackets around {SameLine$}, which simply indicates that an actual match between tags is optional.
Here, in addition to including the basic XML.uc file, it was necessary to add a uCalc scripting language to perform inline indentation. That’s what the EvalSpace line does. Note, you can run files like Basic.Bat, Forth.Bat, Tcl.Bat from the Windows command line, if you’d like to play with interpreters for those languages (REPL.Bat corresponds with a generic uCalc.uc language). These are found in the Misc directory; and you can create your own language (that’s what uCalc Language Builder is all about).
So far, in a number of previous examples, I’ve used search patterns without resorting to regular expressions. Although they are mainly used in uCalc when defining tokens, you can also freely use regular expressions within search patterns. They tend to diminish clarity, but sometimes they may be required. Here I have relegated the regular expression code for white space to the definition section (note: in the current beta, it is now instead XML.uc), and created a SyntaxArg (like a macro) named {whitespace} to preserve clarity in the search patterns (note how each search item above ends with {whitespace}). The SyntaxArg is defined as: [{" [ \r\n\t]+ "}] where the part within quotes is the regular expression. The quotes must be surrounded by curly braces (otherwise it will represent literal text). Following the EvalSpace definition, I have inline code. If Value1 starts with a curly brace, code is executed as part of the search pattern each time there’s a match. For instance, every time <{tag}> {whitespace} is encountered, when it’s replaced with {indent}<{tag}>{indent_incr}{nl}, the {indent} and {indent_incr} items will be replaced with an execution of code as listed in the definition table. If the Value1 section of an Inline definition does not start with a curly brace, then that code is executed once when the search starts (as with the #Def Const: Size statement).
Now let’s work with PrettyXML_Color.uc . Using the same docx file, the result looks much better, like this:
Now open PrettyXML_Color.uc for examination. It should look like this:
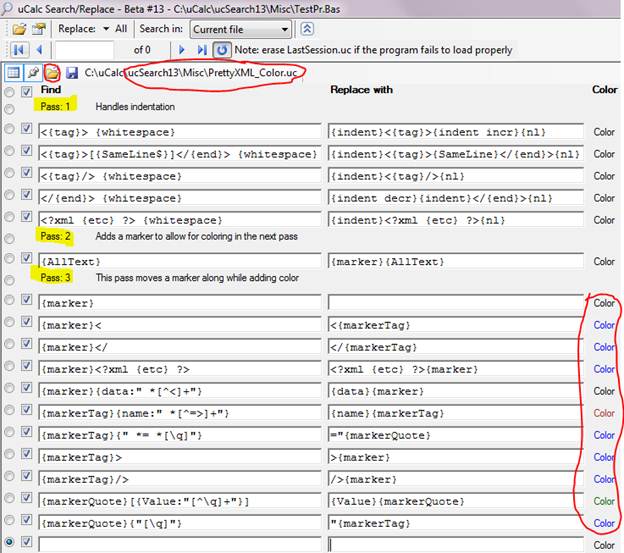
Explanation
The first section is pretty much identical to the one in the black/white transform. This transform adds two additional sections. The program will pass through the XML code three times. The first pass (indicated by Pass: 1) will add indentation, just like before (see PrettyXML_BW.uc). The second pass inserts a marker at the very the beginning of the code. This marker is defined in the definition section as ASCII code {#20}. This is a somewhat arbitrarily chosen value; one that is unlikely to occur in plain text.
The algorithm in the third pass is very straight-forward. The marker is gradually moved from the beginning of the XML code to the end (at which point it is forced to disappear). As it goes along, the modification that occurs consists of switching positions of the marker with the matching text, as it applies color to that text. The marker itself changes to and from {marker}, {markerTag}, and {markerQuote}, depending on its location (see their definition in an earlier picture).
One other item of importance to this example is that the Pass once property for most items in the third section, is set to False, instead of the default True. There’s a distinction between the Pass property of each of the 3 sections, and each pattern’s individual pass property. The program will pass through the overall XML code three times. However, each time a match is found and text is replaced, there’s the option to move on (default), or to pass over the match again. When Pass once is set to False, it will pass over a given match repeatedly until it’s completely reduced and no more change is possible. In this particular example, because of the way the algorithm is set up, it will pass exactly 2 times over each match and not more. But the Basic.uc file, for instance contains many situations where it may pass through the same line many more times.
Pass once should be set to False only when absolutely necessary. Otherwise it can slow down a search/replace operation. It can also result in an infinite loop.
Also of importance here, and in other multi-search examples is the order of the patterns. In some cases it doesn’t matter. However, in other cases it makes all the difference. Some matches are captured by multiple patterns. The ones further down take precedence over the ones above. So you will typically want to have the more specific patterns towards the bottom, and the more general ones that catch everything else, towards the top.
Example H: Parsing LMNL - Layered Markup and Annotation Language
Visit www.ucalc.com/lmnl/lmnl.htm for this example.
Your feedback is very important!